Transform your game room and protect your walls simultaneously by building a dart board cabinet! This article will guide you through the process, from choosing the right materials to the final assembly, ensuring you have a stylish and functional addition to your home. We’ll also cover essential setup tips, lighting considerations, and how to properly mount your new cabinet, giving you the perfect darts experience.
⚠️ Still Using Pen & Paper (or a Chalkboard)?! ⚠️
Step into the future! The Dart Counter App handles all the scoring, suggests checkouts, and tracks your stats automatically. It's easier than you think!
Try the Smart Dart Counter App FREE!Ready for an upgrade? Click above!
Why Consider Building a Dart Board Cabinet?
While purchasing a pre-made dart board cabinet is certainly an option, building a dart board cabinet offers several advantages. First and foremost, it allows for complete customization. You can choose the exact dimensions, materials, and finish to perfectly match your existing décor and personal preferences. You also have the flexibility to incorporate features that might not be available in standard cabinets, such as custom lighting, integrated scoreboards, or even storage for your darts and accessories.
Furthermore, building a dart board cabinet can be a rewarding DIY project. It provides an opportunity to hone your woodworking skills and create something truly unique. Plus, it can often be more cost-effective than buying a high-quality, pre-built cabinet.
Planning Your Dart Board Cabinet Project
Essential Tools and Materials
Before you start building your dart board cabinet, you need to gather the necessary tools and materials. The specific items will vary depending on your design and complexity, but here’s a general list:
- Wood: Plywood, MDF, or solid wood (pine, oak, etc.)
- Fasteners: Screws, nails, wood glue
- Hinges: For the cabinet doors
- Latches or Magnets: To keep the doors closed
- Sandpaper: Various grits for smoothing surfaces
- Primer and Paint/Stain: For finishing
- Dartboard Mounting Hardware: Screws, brackets
- Measuring Tape and Ruler
- Pencil
- Saw: Circular saw, jigsaw, or hand saw
- Drill/Driver
- Sander
- Clamps
- Safety Glasses
- Dust Mask
Dart Board Cabinet Design Considerations
The design of your dart board cabinet should reflect your personal style and functional needs. Consider the following factors:
- Size: Ensure the cabinet is large enough to fully enclose the dartboard and provide adequate protection for the surrounding wall.
- Door Style: Choose between single doors, double doors, or a cabinet with no doors.
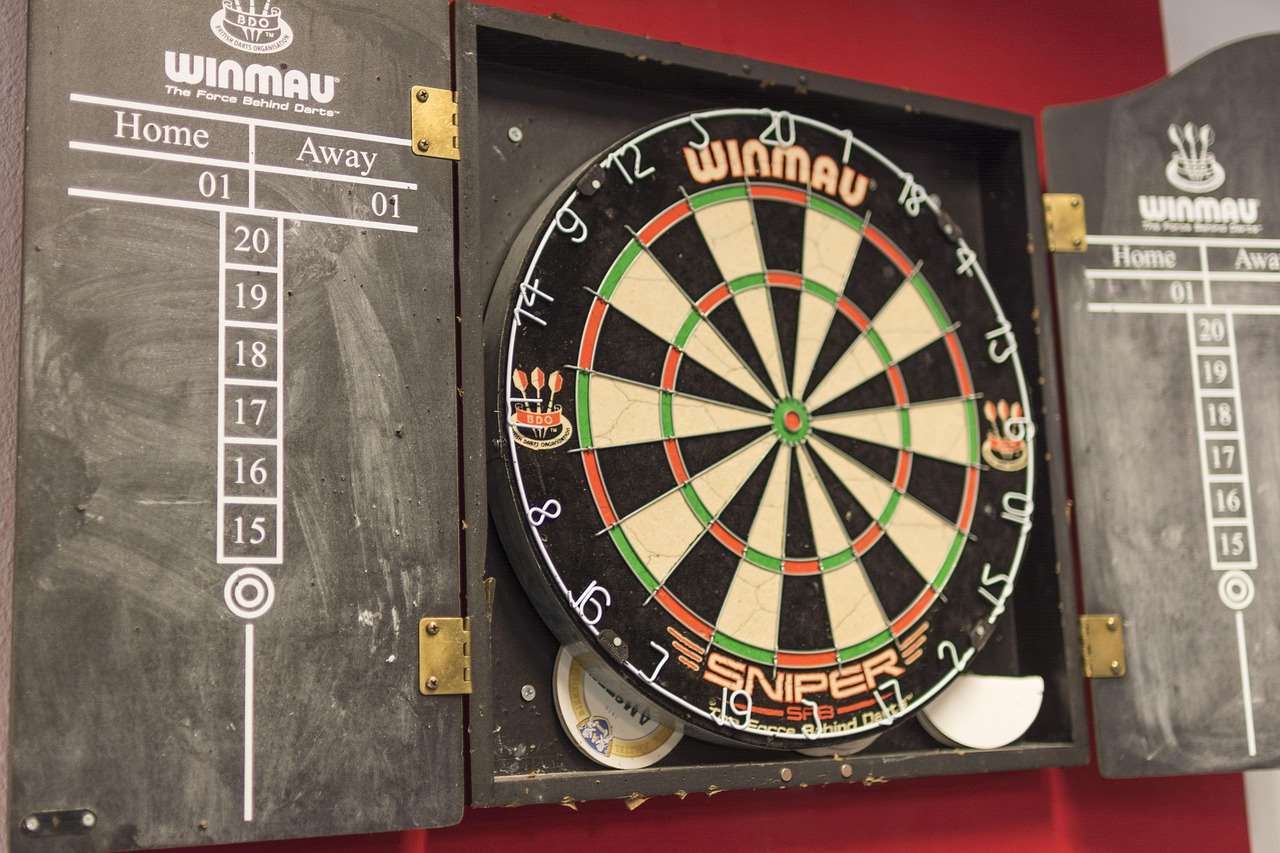
- Scoreboard Integration: Decide whether you want to incorporate a traditional chalkboard scoreboard, a whiteboard, or even a digital display. Consider a darts score blackboard.
- Lighting: Plan for integrated lighting to illuminate the dartboard for optimal visibility.
- Storage: Include shelves or compartments for storing your darts, flights, and other accessories.
- Wood Choice: Selecting the right wood is important for the longevity of your cabinet. Softer woods are generally easier to work with, while hardwoods will offer increased durability.
Sketch out your design on paper or use a CAD program to create a detailed plan. This will help you visualize the finished product and ensure that all the pieces fit together correctly. Don’t forget to consider the length of a darts oche when deciding where to place your board and cabinet!
Step-by-Step Guide to Building Your Cabinet
Cutting the Wood
Carefully measure and cut all the pieces according to your design plan. Use a saw to make clean, accurate cuts. Remember to wear safety glasses and a dust mask to protect yourself from flying debris. If you’re unsure about making precise cuts, consider having a local hardware store cut the wood for you.
Assembling the Cabinet Frame
Once all the pieces are cut, begin assembling the cabinet frame. Use wood glue and screws to join the pieces together. Clamps can be used to hold the pieces in place while the glue dries. Ensure that all corners are square and that the frame is sturdy.
Attaching the Backing
Cut a piece of plywood or MDF to fit the back of the cabinet frame. Attach it using nails or screws and wood glue. The backing provides additional support and stability to the cabinet.
Installing the Doors
Attach the hinges to the cabinet frame and the doors. Make sure the doors are aligned properly and swing smoothly. Install latches or magnets to keep the doors closed when not in use.
You might want to consider using soft-close hinges for a more premium feel. These prevent the doors from slamming shut, reducing noise and wear and tear.
Adding Finishing Touches
Sand all the surfaces of the cabinet to create a smooth finish. Apply a coat of primer and then paint or stain the cabinet to your desired color. Consider adding decorative trim or moldings to enhance the appearance of your cabinet.
Lighting Installation
Integrating proper lighting is crucial for an enjoyable dart playing experience. There are several options available. Battery-powered LED strip lights offer a simple and affordable solution, while hardwired options provide a more permanent and professional look. Choose lights that cast a bright, even light across the dartboard without creating glare. Remember to factor in the placement of the lighting during the design phase of building a dart board cabinet.
Mounting Your Dart Board and Cabinet
Finding the Right Location
Choose a location for your dart board cabinet that has plenty of space around it. The official throwing distance is 7 feet 9 1/4 inches from the face of the board (or 2.37 meters). Make sure there are no obstructions in the throwing area and that the surrounding walls are protected. A how long darts oche is crucial for proper gameplay.
Mounting the Cabinet to the Wall
Use a stud finder to locate the wall studs. Attach the cabinet to the studs using screws. If you can’t find a stud, use wall anchors to provide additional support. Ensure that the cabinet is level and securely mounted to the wall.
Hanging the Dartboard
Follow the manufacturer’s instructions for hanging the dartboard inside the cabinet. Use a level to ensure that the dartboard is perfectly vertical. The center of the bullseye should be 5 feet 8 inches (1.73 meters) from the floor. With careful planning, building a dart board cabinet can create a great centerpiece for your game room.
Customization and Personalization
Adding a Custom Scoreboard
One of the best ways to personalize your building a dart board cabinet project is by adding a custom scoreboard. You can create a traditional chalkboard or whiteboard scoreboard, or even integrate a digital display. Consider using stencils or freehand lettering to create a unique design. Another option is using an app to keep score. Check out App to score darts.
Incorporating Storage Solutions
Add shelves or compartments to the cabinet to store your darts, flights, and other accessories. You can use wood, metal, or even plastic to create these storage solutions. Consider adding small drawers or cubbies to keep everything organized.
Adding Decorative Elements
Personalize your cabinet with decorative elements such as trim, moldings, paint colors, or even stencils. You can also add custom hardware, such as knobs and pulls, to enhance the appearance of your cabinet.
Maintaining Your Dart Board Cabinet
Cleaning and Care
Regularly clean your dart board cabinet to keep it looking its best. Wipe down the surfaces with a damp cloth to remove dust and dirt. Use a wood cleaner or polish to protect the finish. Check the hinges and latches periodically and tighten them as needed.
Dartboard Maintenance
Rotate your dartboard regularly to ensure even wear. This will help prolong the life of your dartboard and prevent it from becoming too worn in certain areas. Remove any loose fibers from the dartboard using a soft brush.
Conclusion: Enjoy Your Handcrafted Dart Board Cabinet
Building a dart board cabinet is a rewarding project that allows you to create a custom and functional addition to your home game room. By following these steps and incorporating your own personal touches, you can create a beautiful and durable cabinet that will provide years of enjoyment. From choosing the right materials to adding custom features, the possibilities are endless. So gather your tools, unleash your creativity, and start building a dart board cabinet today! Why not show it off once it is done!
Hi, I’m Dieter, and I created Dartcounter (Dartcounterapp.com). My motivation wasn’t being a darts expert – quite the opposite! When I first started playing, I loved the game but found keeping accurate scores and tracking stats difficult and distracting.
I figured I couldn’t be the only one struggling with this. So, I decided to build a solution: an easy-to-use application that everyone, no matter their experience level, could use to manage scoring effortlessly.
My goal for Dartcounter was simple: let the app handle the numbers – the scoring, the averages, the stats, even checkout suggestions – so players could focus purely on their throw and enjoying the game. It began as a way to solve my own beginner’s problem, and I’m thrilled it has grown into a helpful tool for the wider darts community.